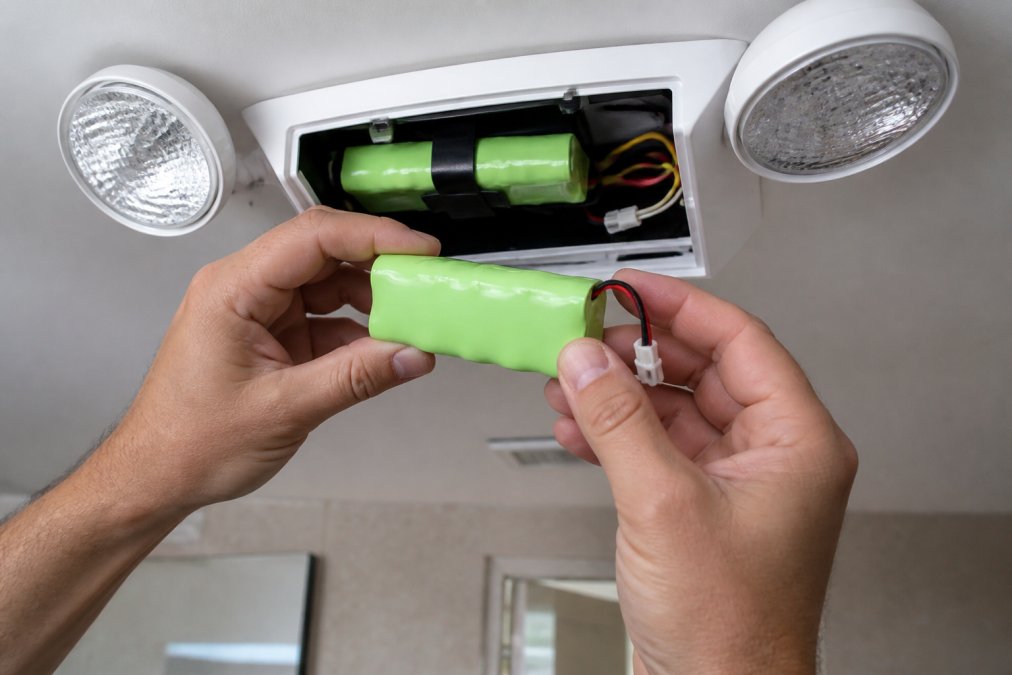
 ultimate-guide
Emergency Lighting Battery Replacement Guide
Table of Contents
- Identifying the Correct Battery Type for Your Emergency Light
- Safety Precautions Before You Start Battery Replacement
- Tools and Materials Required for Emergency Lighting Battery Replacement
- Step-by-Step Emergency Lighting Battery Replacement Instructions
- Testing Your Emergency Light After Battery Installation
- NFPA 101 Emergency Lighting Requirements and Compliance
- Emergency Light Battery Testing Procedures and Inspection Logs
- Emergency Lighting Maintenance Checklist for Ongoing Care
- Frequently Asked Questions
Emergency Lighting Battery Replacement Guide
Last Updated: August 3, 2026
Emergency lighting systems are critical safety infrastructure in commercial buildings. When an emergency light fails, it's a code violation that exposes your facility to liability. This guide from Bigtime Battery covers identifying the right battery, performing safe replacement, and maintaining NFPA 101 compliance.
Identifying the Correct Battery Type for Your Emergency Light
The biggest mistake facilities make is assuming all emergency light batteries are the same. Your fixture uses one of two primary chemistries, and installing the wrong one will fail immediately or damage the circuit board.
Nickel-cadmium (Ni-Cad) batteries were the standard for decades and still power many older fixtures. They tolerate overcharging, survive temperature swings, and maintain voltage under load. Ni-Cad packs typically measure 6.0 volts with faston connectors (flat metal tabs). However, they're toxic and require special EPA-regulated disposal.
Sealed lead-acid (SLA) batteries are the modern replacement. They're cheaper, safer to dispose of, and widely available. SLA batteries come in the same voltage ratings but with varying connector styles, faston connectors, threaded terminals, or proprietary connectors. The key difference is that SLA batteries are sensitive to overcharging, which is why some fixtures require a different charger circuit when you switch chemistries.
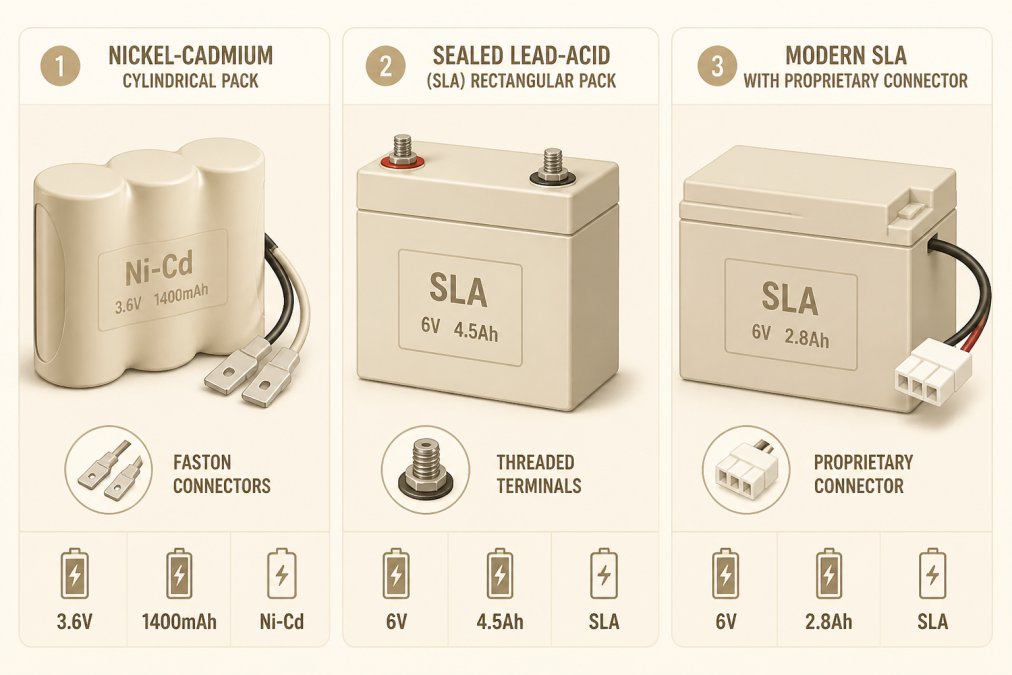
Visual identification guide for non-technical users
Start by looking at the label on your existing battery. The label will state the chemistry (Ni-Cad or SLA), voltage (usually 6V or 12V), and amp-hour capacity. Nickel-cadmium packs are almost always cylindrical with a distinctive metal band around the middle and faston connectors. Sealed lead-acid batteries look like small car batteries, rectangular and lighter in weight, with terminals that vary (threaded posts or flat tabs). The connector type determines which battery will physically fit.
Understanding nickel-cadmium vs sealed lead-acid batteries
Nickel-cadmium batteries tolerate trickle charging indefinitely without degradation, making them ideal for emergency fixtures. Sealed lead-acid batteries have lower self-discharge and better capacity per unit size, but degrade if overcharged.
When replacing a battery, check the fixture's charging voltage. Most emergency lights charge at 6.8 to 7.0 volts for a 6V pack. If your fixture was designed for Ni-Cad with higher charging voltage (7.2V or more), installing an SLA battery will cause premature failure within 12 to 18 months instead of 4 to 5 years. If switching chemistries, confirm the charger circuit voltage with the fixture manufacturer.
Safety Precautions Before You Start Battery Replacement
Battery replacement is safe if you follow basic precautions. Turn off power to the fixture at the circuit breaker and wait 30 seconds for residual charge to dissipate. Verify the fixture is de-energized by pressing the test button, it should not illuminate.
If working with an old Ni-Cad battery, wear nitrile gloves. Cadmium is toxic and can absorb through skin. Dispose of Ni-Cad batteries through a certified e-waste recycler; throwing them in the trash is illegal. For SLA batteries, the main concern is sulfuric acid inside the case. If the casing is cracked or leaking, do not touch it. Intact SLA batteries are safe to handle.
Work during daylight or with a flashlight nearby. If working on a fixture mounted high on a wall or ceiling, use a stable ladder and have someone spot you.
Tools and Materials Required for Emergency Lighting Battery Replacement
Essential tools:
- Screwdriver set (Phillips and flathead)
- Needle-nose pliers or connector removal tool
- Multimeter (to verify voltage and polarity)
- Flashlight or headlamp
- Nitrile gloves
- New battery (correct chemistry, voltage, and connector type)
The multimeter is the most important tool. It lets you verify that the old battery is dead and confirms polarity before connecting the new battery. A basic digital multimeter costs $15 to $30. Before starting, lay out all tools and the new battery on a clean surface and verify the new battery's voltage and connector type one more time.
Step-by-Step Emergency Lighting Battery Replacement Instructions
The actual replacement takes 10 to 15 minutes for most fixtures.
Disconnecting power and removing the old battery pack
Step 1: Turn off power at the circuit breaker and wait 30 seconds. Press the test button to confirm de-energization.
Step 2: Open the fixture housing. Most emergency lights use a single screw or latch on the front cover.
Step 3: Locate the battery pack, usually mounted on a metal bracket inside the fixture. The battery will have two wires or connectors leading to the circuit board, one positive (red) and one negative (black).
Step 4: Use your multimeter to verify the battery voltage. Set it to DC voltage and touch the red probe to the positive terminal and the black probe to the negative terminal. A 6V battery should read 6.0 to 6.5 volts (or lower if discharged).
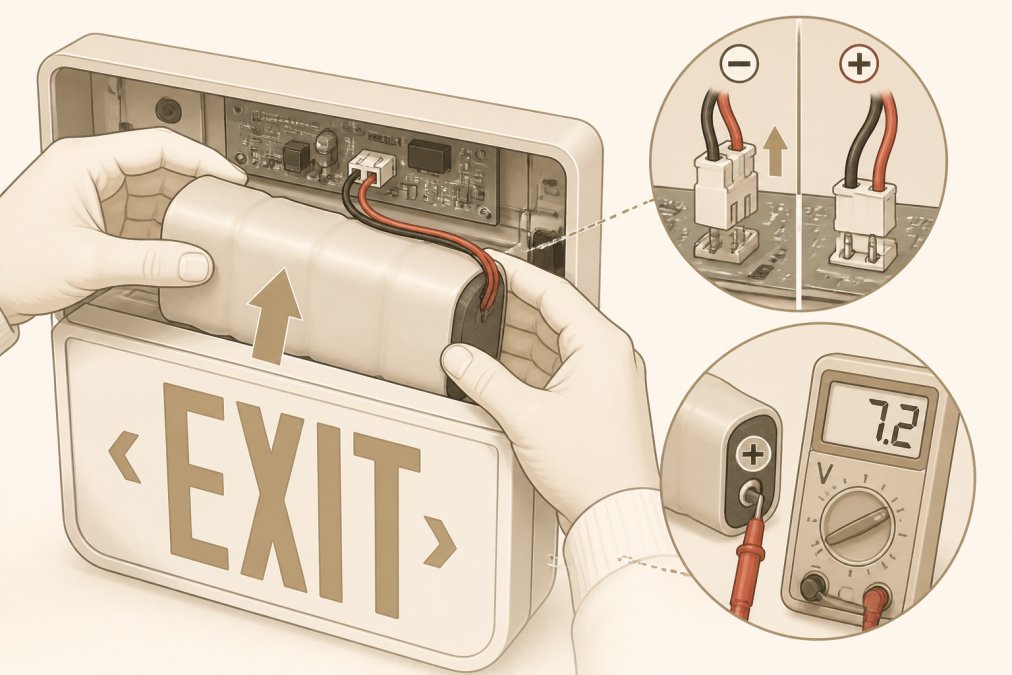
Step 5: Disconnect the negative (black) wire first. This is critical, always disconnect negative before positive. Use needle-nose pliers or your fingers to gently pull the connector straight off.
Step 6: Disconnect the positive (red) wire.
Step 7: Remove the battery from its mounting bracket. Most batteries slide out of a plastic or metal cradle. If stuck, check for a clip or screw holding it in place.
Step 8: Inspect the mounting bracket and circuit board for corrosion. Clean any white or green crusty deposits with a wire brush or cotton swab.
Installing the new battery and checking polarity
Step 9: Slide the new battery into the mounting bracket. Make sure it's seated firmly.
Step 10: Reconnect the positive (red) wire first. Push the connector straight onto the positive terminal until you hear or feel a click.
Step 11: Reconnect the negative (black) wire.
Step 12: Use your multimeter to verify polarity. Set it to DC voltage and touch the red probe to the positive connector and the black probe to the negative connector. You should see a positive voltage reading (e.g., +6.0V, not -6.0V). If negative, disconnect immediately and swap the wires.
Step 13: Close the fixture housing. Make sure the lens or cover is secure and the fixture is sealed against dust and moisture.
Step 14: Turn the power back on at the circuit breaker.
Step 15: Wait 5 minutes for the battery to begin charging. Press the test button. The emergency light should illuminate at full brightness. If dim or dark, turn off power and verify the connections again.
Testing Your Emergency Light After Battery Installation
Testing confirms the battery is charging and the fixture will work during a power outage.
Functional test: With power on, press the test button. The emergency light should illuminate at full brightness within one second. If dim, the battery isn't charging properly, check the connections and charger circuit voltage.
Duration test: Press and hold the test button for 90 seconds. The light should remain at full brightness. If brightness fades or flickers, the battery is weak or the charger circuit is faulty.
Charging verification: Leave the fixture powered on for 24 hours. Press the test button again. The light should still be at full brightness. If the battery lost significant charge overnight, the charger circuit isn't working. Check the charging voltage with your multimeter (should be 6.8 to 7.0V for a 6V battery).
Most emergency light fixtures have an indicator light showing charging status. A green light means normal charging. A red light indicates a charging fault.
NFPA 101 Emergency Lighting Requirements and Compliance
The Life Safety Code (NFPA 101) requires that emergency lighting remain operational for at least 90 minutes during a total loss of normal power. A typical exit sign uses 10 to 20 watts. A 6V, 10 amp-hour battery can power a 10-watt exit sign for approximately 6 hours, exceeding the 90-minute requirement.
The code also requires that emergency lighting illuminate to at least 1 foot-candle at floor level along the exit route. NFPA 101 requires that emergency lighting circuits be separate from normal lighting circuits. Most facilities have dedicated breakers, but older buildings sometimes share circuits.
The code requires monthly testing and annual inspection by a qualified person. Monthly testing confirms the light illuminates and the battery is charging. Annual inspection includes a 90-minute duration test and verification that the fixture is clean and undamaged.
Emergency Light Battery Testing Procedures and Inspection Logs
Establishing a testing and inspection routine is the easiest way to maintain compliance and prevent failures.
Monthly functional test (5 minutes per fixture): Press the test button on each emergency light. The light should illuminate at full brightness within one second. If dim or dark, note the fixture location and schedule a battery replacement or repair. Record the test date and result in a spreadsheet or log.
Quarterly 30-minute duration test: Select one fixture per quarter and press the test button while recording the time. The light should remain at full brightness for 30 minutes. If it dims or fails before 30 minutes, the battery or charger circuit is failing.
Annual 90-minute duration test and inspection: Once per year, perform a full 90-minute test on each fixture. The light must remain at full brightness for the entire 90 minutes. Simultaneously, inspect the fixture for physical damage, corrosion, dust accumulation, and loose connections.
| Test Type | Frequency | Duration | Pass Criteria | Action if Failed |
|---|---|---|---|---|
| Functional (test button) | Monthly | 5 minutes | Light illuminates at full brightness within 1 second | Schedule battery replacement or repair |
| Duration (30-minute) | Quarterly | 30 minutes | Light remains at full brightness for 30 minutes | Check battery and charger circuit |
| Duration (90-minute) | Annually | 90 minutes | Light remains at full brightness for 90 minutes | Full inspection and battery/circuit repair |
| Physical inspection | Annually | 10 minutes | No corrosion, damage, or loose connections | Clean contacts, tighten connections, or replace fixture |
Keep logs for at least three years. During fire department inspections, inspectors will ask to see your testing documentation.
Emergency Lighting Maintenance Checklist for Ongoing Care
Preventive maintenance extends battery life, prevents unexpected failures, and maintains code compliance.
Battery maintenance:
- Verify the battery is seated firmly in its mounting bracket
- Check for corrosion around terminals and clean if necessary
- Confirm the positive and negative connectors are tight and show no signs of arcing or heat damage
- Test the battery voltage with a multimeter, it should match the rated voltage when fully charged
- If the battery is more than five years old, consider preventive replacement
Charger circuit maintenance:
- Measure the charging voltage with a multimeter (should be 6.8 to 7.0V for a 6V battery)
- If the voltage is significantly higher or lower, the charger circuit may be failing
- Look for burn marks or discoloration on the circuit board around the charging terminals
Fixture and housing maintenance:
- Clean the lens or light cover with a soft cloth
- Inspect the housing for cracks, gaps, or signs of moisture ingress
- Check the mounting bracket for rust or corrosion
- Verify the fixture is securely mounted
Documentation:
- Record the battery installation date on a label affixed to the fixture
- Document the battery chemistry (Ni-Cad or SLA) and voltage
- Keep a facility-wide inventory of emergency light locations, battery types, and last replacement dates
At Bigtime Battery, we recommend replacing all emergency light batteries every four years, even if they're still working. This approach prevents unexpected failures and simplifies maintenance planning.
Emergency lighting batteries are a critical safety system that often gets overlooked until they fail. By following this guide, you'll eliminate the guesswork from battery selection, installation, and maintenance. Bigtime Battery stocks a wide selection of emergency light batteries, nickel-cadmium, sealed lead-acid, and modern lithium alternatives, with fast shipping. Establish a testing routine, keep detailed logs, and your facility will maintain code compliance while avoiding the liability of failed emergency lighting during a power outage.
Frequently Asked Questions
How often should I replace emergency light batteries?
Most emergency lighting batteries require replacement every 3-5 years, depending on usage patterns and battery chemistry. Nickel-cadmium batteries typically last 3-4 years with proper maintenance, while sealed lead-acid batteries may reach 5 years. Check your fixture's documentation and follow NFPA 101 requirements for your specific installation. Annual testing helps identify batteries nearing end-of-life before failure occurs.
What tools do I need for emergency lighting battery replacement?
You'll typically need a screwdriver set (Phillips and flathead), wire strippers, a multimeter for voltage testing, and potentially a wrench for terminal connections depending on your connector type. Have a clean cloth and safety glasses available. For sealed lead-acid batteries, wear gloves to prevent skin contact. Check your fixture assembly documentation for specific tool requirements before starting.
How do I know what battery my emergency light needs if the label is worn off?
Examine the fixture housing for any remaining markings or part numbers. Check the wiring diagram inside the fixture or contact the manufacturer with your exit sign model number. Measure the battery pack dimensions and note the terminal style (faston connectors are common). Voltage and amp-hour capacity are usually printed inside the fixture. If unsure, contact Bigtime Battery customer service with photos of your fixture for identification assistance.
What does NFPA 101 require for emergency lighting battery testing?
NFPA 101 Life Safety Code requires emergency lighting systems to be tested monthly for 30 seconds and annually under full-load discharge conditions. Monthly tests verify the indicator light functions and the fixture illuminates. Annual tests must run the system on battery power for 90 minutes to ensure full capacity. Maintain inspection logs documenting all test results, dates, and any maintenance performed to demonstrate compliance.
Can I replace emergency light batteries myself, or do I need a professional?
Many property managers and facility operators replace batteries themselves following proper procedures. However, compliance documentation and professional testing may be required for commercial buildings. Always follow safety precautions, disconnect AC power before starting, and verify polarity before reconnecting. If your facility requires inspection logs and compliance certification, consider professional installation to ensure documentation meets NFPA 101 requirements.
What's the difference between nickel-cadmium and sealed lead-acid batteries for emergency lights?
Nickel-cadmium batteries are lighter, handle temperature extremes better, and tolerate overcharging. Sealed lead-acid batteries offer higher capacity at lower cost and are environmentally preferable in many applications. Ni-Cad batteries discharge more slowly and maintain voltage longer under load. Sealed lead-acid provides better amp-hour capacity for the same size. Check your fixture specifications to ensure you're replacing with the correct chemistry your system was designed for.
What should I do if the indicator light doesn't work after battery replacement?
First, verify polarity is correct by checking the battery pack terminals match the fixture markings. Confirm the battery is fully charged by testing voltage with a multimeter. Press the test button to verify the circuit board responds. Check the connector type and ensure it's fully seated. If the indicator light still doesn't function, the circuit board may need replacement. Test the fixture under load to confirm it operates on battery power even if the indicator is faulty.